It is easy to scan paper documents and attach them to dispatches in AngelTrack.
Using a Scanner
Scan your documents, and tell the scanner to output the datafiles as JPG or PNG where possible. Select a resolution of 150 DPI -- what we believe is a good compromise between quality and size -- if your employer has not announced a scanning policy specifying a different DPI. Save the scanned documents in a convenient folder on the computer where you can easily find them again.
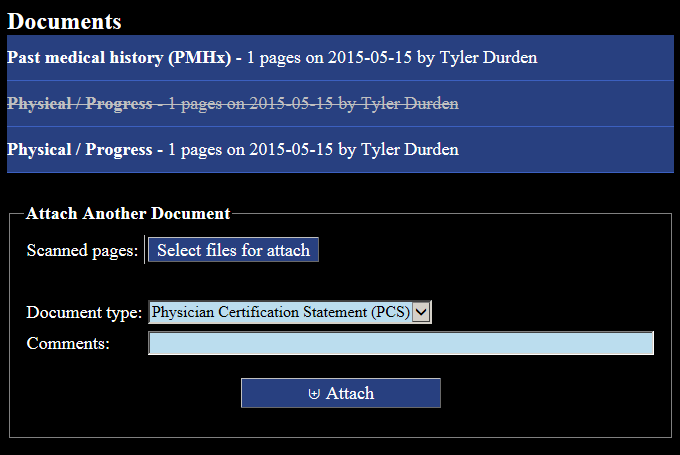
Next, open the PCR for the desired dispatch, and select the Documents tab. Here you can specify the scanned images you saved earlier to the folder. You can attach multiple pages if needed. Select a document type that best reflects the document's contents, and provide a comment if there is anything unusual about the document. Then click 'Save' to upload all the images. It may take a while for all the data to be transferred.
Do not use TIFF
Some scanners support multiple-page scans called TIFFs. A single TIFF file contains all of the pages in the document. TIFF files will not work with AngelTrack, because most browsers do not know how to display them properly, and so your scanned pages will not show up in the printed run report.
You can use JPG, PNG, GIF, BMP, or SVG. AngelTrack will automatically convert everything to JPG.
Using the Camera in Your Mobile Device
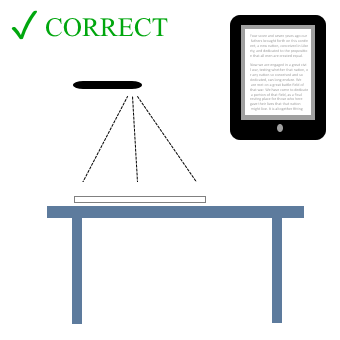
Proper technique is essential when using your mobile device to scan documents into AngelTrack. Here is a list of tips for ensuring your photos are legible:
- Wipe any dust and fingerprints from the camera lens; a microfiber cloth will work best.
- Find a well-lit area. If there's not enough light indoors, just go outside and scan them on the sunlit seat of your vehicle.
- Lay documents on a flat surface.
- Hold the camera directly above the document, so that document appears rectangular in the viewfinder.
- Move the camera closer to the document until it exactly fills the viewfinder, so that there is no wasted space in the image.
- If your hand shakes while taking a picture, just retake the picture until you get a steady image.

After all pages are photographed, select the PCR's Documents tab, and click the "Select files for attach" button. Your mobile device's camera roll / photo album will open, allowing you to select all of the photos you just took. You can attach multiple pages.
Before clicking "Save", select a document type that best reflects the document's contents, and also provide a comment if there is anything unusual about the document.
Your smartphone may have a better camera than your tablet
If your tablet's camera isn't giving satisfactory results, try using your smartphone's camera instead. There is a great variance in the optical quality and in the resolution of cameras in mobile devices, so try the various devices at your disposal until you find one that performs well at document imaging.
Landscape / portrait orientation problems
Oftentimes you will upload a photograph that looks a certain way on your mobile device, only to see that AngelTrack has rotated its orientation -- from portrait to landscape, or from landscape to portrait.
This is an illusion. AngelTrack never alters the orientation of your uploaded scans, except for ECG strips which AngelTrack automatically rotates to landscape (if not already).
If you upload a scan and the orientation is different than shown on your device, it is because your device is artificially displaying a different orientation, as a convenience... whereas AngelTrack does not make such adjustments, and thus always displays every scan in its native orientation.
In any case, it is easy to flip and rotate your uploaded scans, using the small blue buttons that appear at the bottom of each image.
Problems with the web browser
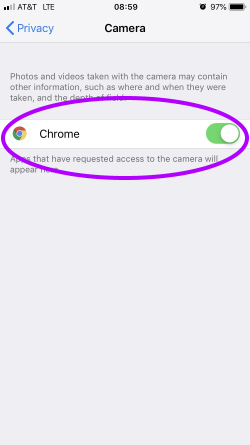
If the browser does not offer the option to take a live photograph, then check the device's settings as regards the browser, and access to the camera and to photo storage.
On an iPhone with both Chrome and Safari browsers installed, the settings are in two places:

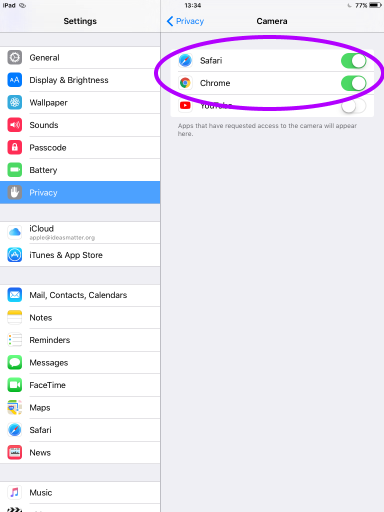
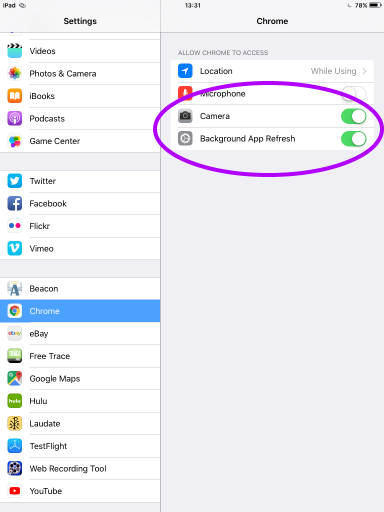
On an iPad with both Chrome and Safari browsers installed, the settings are likewise in two places:
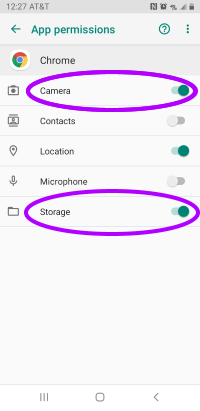
On Android, the settings for Chrome are in App permissions:
Verify Scans, then Dispose of the Paper Documents
The uploaded document will immediately appear in the dispatch's list of attached documents, in the PCR's Documents tab. It will also appear in the dispatch's run report, which you can quickly view using the PCR's Print or PDF features.
Verify that each photograph or scan is legible. Remember that the company's billers must be able to read everything on the page, including the fine print.
Rotate and flip the pages as necessary
Many mobile devices capture their images in landscape format, temporarily rotating the images to portrait when viewed in the device's camera roll. When you upload these landscape images to AngelTrack, AngelTrack doesn't know they are sideways, and so will display them incorrectly.
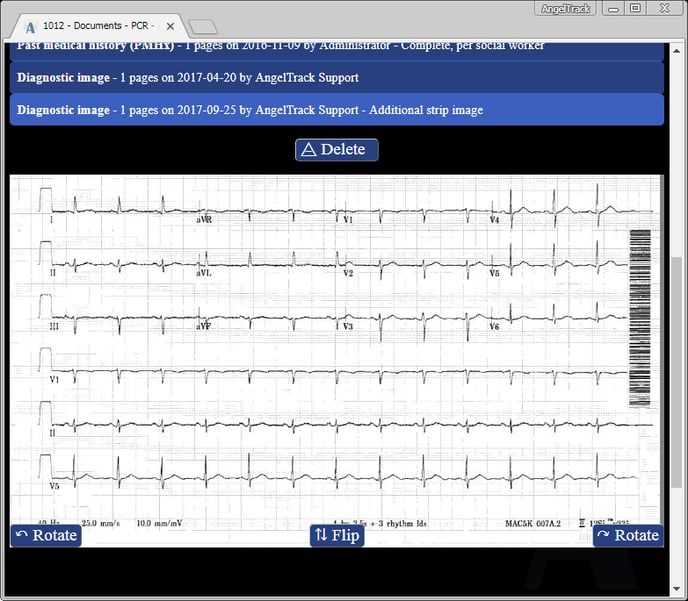
You can easily correct this by clicking the ↶ Rotate, ↷ Rotate, ⇄ Flip, and ⇅ Flip buttons which appear along the bottom of each page scan.
Disposal of paper documents
 After you have verified the scan appears properly in AngelTrack, you may need to store the paper copies for a certain period of time or dispose of them. Company policy will dictate how and when this is done: there will usually be a shredder or a to-be-shredded box for ordinary documents, and a locked collection box for paper PCS forms and face sheets.
Remember, it is your responsibility to photograph all paper documents into AngelTrack, in order to protect the billing office from the error-prone chore of scanning paper documents and trying to match them up with dispatch and patient records. Then you must see to it that all paper pages are disposed of in a HIPAA-compliant manner.
Soft Deletion in AngelTrack
You can mark a document "deleted", and then undelete it, as you see fit... but once uploaded, the document will be there for seven years.
Deleted documents do not appear in the final run report. Remember that deletion affects all pages in the document; you cannot delete just one page of a multi-page document.
Automatic Sharing Between Dispatches
Uploaded documents are automatically shared across all of the patient's transports, so you only need to upload them once. Shared documents will appear in the PCR Documents list for all applicable dispatches, just as if you'd uploaded them yourself.
Different document types are shared differently, according to the Document Persistence and Sharing Rules. For example, a face sheet will attach to all of the patient's calls for the next 60 days.
Note that there are special rules for DNR documents and DNR revocations: a DNR or DNR revocation, once uploaded, will last indefinitely and will supersede all earlier DNR and DNR revocation documents. To learn more, read the DNRs and DNR Revocations Guide.