AngelTrack tracks each check and EFT separately from the many payment events that it creates for the affected dispatches, and likewise separately from any ledger entries that it creates.

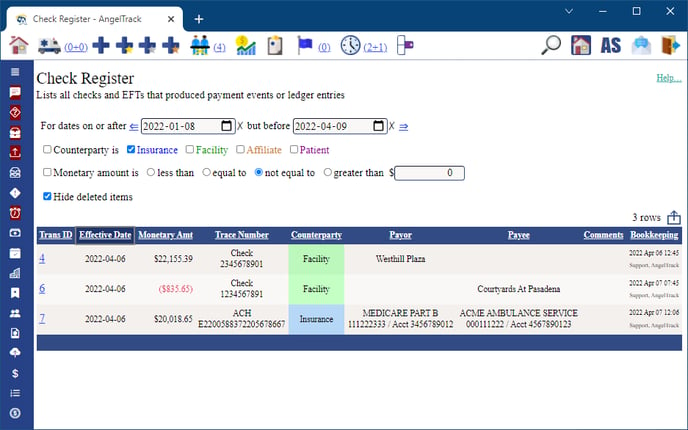
The data is available in the Check Register, available under Billing Home. It is intended to be used to compare your bank records against AngelTrack's records in order to identify missed deposits.
Fully Automatic
AngelTrack will add a record to its check register under all of the following circumstances:
- When the clearinghouse uploader/downloader automatically imports an X12.835 EOB that specifies one or more checks/EFTs issued in connection to adjudications also being imported.
- When a biller manually imports an X12.835 EOB that specifies one or more checks/EFTs issued in connection to adjudications also being imported.
- When a biller marks an invoice as "paid" and specifies a check or EFT number. (See below for instructions on applying a single check to multiple invoices.)
- When a biller manually creates a payment event and specifies a check or EFT number along with a monetary amount.
No manual record creation
It is not possible to manually add a record directly to the check register. Instead, check register records are automatically created and linked whenever you create non-zero payment event records during the situations listed above.
Source EDIs are reviewable later
If a transaction record in the check register was created by an X12.835 EOB, then AngelTrack will also store the entire EDI so that you can review it later and even re-import it if necessary.
To view the EDI associated with a transaction record in the check register, open the transaction, find the "Source EDI" section, and click the "View" or "Reimport" links.
Check-Register Transactions, Payment Events, and Ledger Entries
Check-register transactions, payment events, and ledger entries are the three pillars of AngelTrack's billing system. Here is how they relate:
- A transaction in the check register represents a financial event that occurred outside of AngelTrack. For example, it might be a check or a wire transfer, or a credit card payment.
- A payment event, on the other hand, represents the application of that financial event to a particular receivable inside of AngelTrack.
- Finally, a ledger entry represents the carry-forward of that financial event into the future until there is a receivable to which it can be applied (and thus become a payment event).
For example, suppose a nursing home sends check #1234 for $1500 against an invoice containing five trips, but only $1400 is currently owed for those trips. AngelTrack will create the following records:
- One transaction record in the check register for check #1234 in the amount of $1500.
- Five payment events, one for each of the five trips, allocating $1400 among them. These payment event records are attached to the dispatches rather than to the facility.
- One ledger entry, in the amount of a $100 credit, as the carry-forward of the overpayment. The ledger entry is attached to the facility's record rather than to its receivables.
From the transaction record in the check register, a biller can then browse to the payment events and ledger entries that it created. Likewise, from any of the associated payment events and ledger entries, a biller can browse to the initiating transaction record in the check register.
To learn more about ledger entries, read the Ledger Entries Guide.
PLBs aka Provider-Level Adjustments
EOBs from insurance carriers will often include "provider-level adjustments" to the check amount. The adjustments represent carry-forwards, claw-backs, pended payments, and IRS withholding. They are called "PLBs" because PLB is their loop name when they appear in an X12.835.
Because PLBs are adjustments to the issued check amount and not adjudications, PLBs do not become payment events in AngelTrack. Instead, PLBs are recorded separately as part of the transaction record in the check register, where their function is to explain why the check's monetary amount is different from the payment events (i.e. the adjudications) that it created.
For example, suppose Medicare issues EFT #2345 for $1400 against a claim for five BLS pickups, adjudicating a $300 benefit for each pickup but holding back $100 for a prior overpayment. AngelTrack will create the following records:
- One transaction record in the check register for EFT #2345 in the amount of $1400.
- One PLB entry in the transaction record, in the amount of a $100 debit, represents the clawback of a prior overpayment.
- Five payment events, one for each of the five trips, allocating a $300 payment for each.
Thus the $1400 check is fully documented as five $300 benefit payments minus a $100 clawback.
You can review any transaction record's list of PLBs the same way you would review its payment events: Open the transaction record and then switch to the "Provider Adjust" tab.
Flagging a Transaction for Review
Each transaction record in the check register has a "Needs Review" flag ![]() that you can raise or lower as you see fit, indicating that somebody needs to back later and take a closer look at the transaction.
that you can raise or lower as you see fit, indicating that somebody needs to back later and take a closer look at the transaction.
Flagged transactions will be reported in the "Check Register" dashboard on the Billing Home page so that all billers can see when there are transactions needing review.
AngelTrack will automatically flag a newly-created transaction for review if it includes any PLBs.
Editing the Check Register
At any time, billers can visit the Check Register, available under Billing Home, to view and edit the records.
For each transaction record in the register, you can also review all payment events and ledger entries that are associated with it.
Likewise, from any payment event or ledger entry that is associated with a record in the check register, AngelTrack will offer a link to view the associated transaction in the check register:
- In any grid of payment events, a link to the check register will appear next to the payment amount in any row that has a check-register transaction associated with it.
- In any grid of ledger entries, a link to the check register will likewise appear for any ledger entry that has an associated check-register transaction record.
- On the Payment Event Edit page, if there is an associated record in the check register, then the "Date check issued" will become a link to the associated check-register transaction record.
Delete and Undelete
Records in the check register are deleted and undeleted under the following circumstances:
Automatic delete of a transaction
AngelTrack will automatically mark as "deleted" any record in the check register for which all associated payment events are marked as "deleted," and all associated ledger entries are zeroed out.
When this occurs as you are deleting a payment event, you will see an acknowledgment on your screen that the linked transaction record was also deleted.
Automatic deletion also occurs during mass-deletion events, such as changing an invoice from "paid" to "canceled". When all of the invoice's associated payment events are marked as "deleted," and if the check is not associated with any other uncancelled invoices, then AngelTrack will automatically mark the transaction record as "deleted".
Automatic undelete of a transaction
AngelTrack will automatically un-delete any deleted record in the check register whenever a biller un-deletes any payment event associated with it.
When this occurs as you are un-deleting a payment event, you will see an acknowledgment on your screen that the linked transaction record was also un-deleted.
Manual delete of a transaction
If you edit a record in the check register and delete or undelete it, AngelTrack will not automatically delete or undelete its linked payment events and ledger entries. You must review and delete/undelete them yourself.
Insurance Carriers Who Issue Checks to Patients
Sometimes insurance carriers will ignore the "pay to EMS" directive in your claims and will cut a check directly to the patient. If these checks are reported in the X12.835 EOB, then AngelTrack will add them to the check register, even though they were deposited into somebody else's bank account.
To identify these, review the Check Register's "Payee" column for any entry that is not your company's name or bank account number. For each record you find after you verify that it is correct and expected, edit the transaction record and mark it "deleted". It will then vanish from the check register... though you can retrieve it later by de-selecting the ☑ Hide deleted items tickybox.
Paying Multiple Invoices with a Single Check
Because the check register, payment events, invoices, and ledger entries are all linked, you can use one check to pay multiple invoices or multiple checks to pay one invoice, and AngelTrack will sort it all out.
To pay multiple invoices with a single check, simply follow these steps:
- Select the first target invoice, and click the status link to open the Invoice Pay page.
- Input the full monetary amount and check number, even though it seems like it will overpay the invoice. You can also input the payor name if the default payor name suggested by AngelTrack is incorrect.
- Select the option to ☑ Ignore the overage.
- Click "Save".
- Select the next target invoice and click the status link to open the Invoice Pay page.
- Re-input the check's date, full monetary amount, check number, and payor name, exactly as you did before.
- Wait a few seconds for AngelTrack to look up the check. You should then see AngelTrack say, "Already on-file as transaction xxx", and offer a link to view it.
- If AngelTrack doesn't find the check you input previously, then double-check the date, amount, check number, and payor name. If still no luck, go to the Check Register and compare the date, amount, transaction type, number, and payor name that are on file against the check in your hand.
- Click "Save".
- Repeat steps 5 through 9 through all additional invoices. On the final invoice, instead of choosing ☑ Ignore the overage, instead select ☑ Apply the overage to the ledger to place any remaining monetary amounts on the counterparty's ledger. AngelTrack will later apply any ledger credits to the counterparty's future invoices.
Paying a Single Invoice with Multiple Checks
To pay a single invoice with multiple checks, simply follow these steps:
- Select the target invoice, and click the status link to open the Invoice Pay page.
- Input the first check's monetary amount, check number, and payor name.
- Select the option to ☑ Leave the invoice open, awaiting additional payments or credits.
- Click "Save".
- Select the target invoice again, and click the status link to re-open the Invoice Pay page.
- Input the second check's monetary amount, check number, and payor name. Make sure AngelTrack does not say the check is "Already on-file as transaction xxx,"; if it does say so, then you may've accidentally entered the check a second time.
- If this is not the last check to be entered, then select the option to ☑ Leave the invoice open, awaiting additional payments or credits.
- Click "Save" again.
- Repeat steps 5 through 8 through all additional checks.
Refund Checks You Issue to Customers
If you are recording a payment event or closing an invoice, and if you input a negative monetary amount to indicate a refund you paid, be sure to enter the check number that you printed, or the trace number of the EFT you sent, so that AngelTrack can record the transaction in the check register.
You can refund multiple payment events and/or multiple invoices with a single check or EFT; simply follow the instructions above so that AngelTrack can link all the refunds together as a single record in the check register. That way, it will be easy to compare AngelTrack's records with your bank statement.
Credit-Card Transactions
If you process credit card transactions in the billing office, these can be input in lieu of paper check numbers.
When recording the transaction as a payment event or as a payment against an invoice, AngelTrack will ask for the check number. Simply change the transaction type to "Credit Card", and input the trace number.
Just as you can do with paper checks, you can apply multiple credit-card transactions to a single invoice or a single credit-card transaction against multiple invoices, and AngelTrack will link all the records together.
If you use AngelTrack's integrated credit-card payment system to accept card payments over the phone, then AngelTrack will perform all the bookkeeping for you.
Specifying the Check/EFT While Inputting a Paper EOB
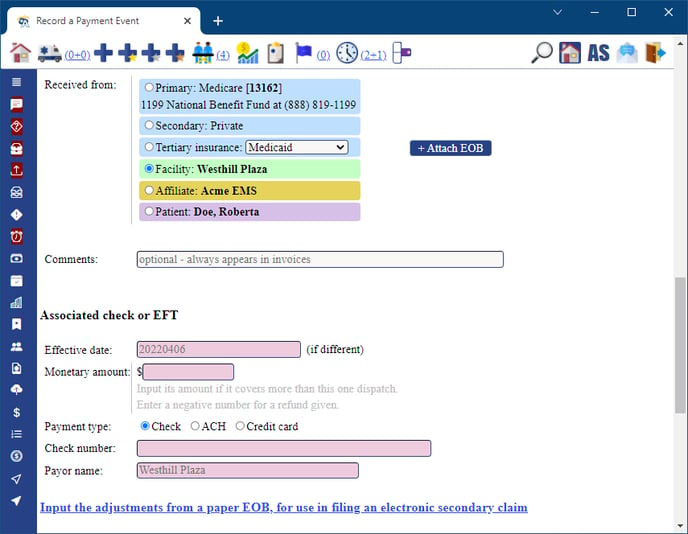
While performing the chore of typing in a paper EOB, it is easy to include the check/EFT information. Here is where the Payment Event Add page asks for the data:
The EOB will probably contain multiple adjudications but only a single check or EFT that covers all of them. For each adjudication (i.e. for each claim), follow these steps to input it:
- Open the Payment Event Add page for the associated dispatch. To quickly do this, perform these steps:
- Find the claim number or "patient account" number on the EOB. It will be in the format ADxxxxxxxN1, where "xxxxxx" is the dispatch ID. For example, dispatch ID 123456 will be claim number AD123456N1.
- From any AngelTrack page, press ALT+G to open the search window.
- In the "Dispatch" search-box, input the dispatch ID that you got from the claim number.
- Do not press ENTER, instead press the letter A.
- On the Payment Event Add page, in the "New payment event" section, do this:
- In the "Amount paid or reversed" box, input the amount the carrier paid against the one claim (i.e. against the one particular dispatch).
- In the "Adjudicated" date field, specify the date of adjudication, aka the "date processed", if the EOB specifies it; otherwise, specify the date the check was issued.
- Make sure the correct carrier (primary/secondary/tertiary) is selected in the "Adjudicated by" section.
- In the "Associated check or EFT" section, fill out the fields like this:
- Effective date: Leave this blank if the EOB didn't specify its date of adjudication or if the date of adjudication is the same as the date the check was issued; otherwise, input the effective date of the check/EFT.
- Monetary amount: Leave this blank if the check amount is equal to the benefit amount for this dispatch, i.e. if the check/EFT paid for only this one claim; otherwise, input the full check/EFT amount, even though it covers multiple claims.
- Payment type: Select "Check" or "ACH" as appropriate.
- Check number / Trace number: Input the check number or trace number of the payment.
- Payor name: Leave this blank if you want AngelTrack to automatically place the patient's insurance carrier name into the field; otherwise, specify the carrier's name.
- Wait a few moments for AngelTrack to look in the check register to see if the check/EFT is already on file. If this is the first adjudication you are entering, then AngelTrack should find nothing; for the additional adjudications covered by the check/EFT, AngelTrack should find the check/EFT you input earlier; if it doesn't, then double-check that all the data fields match.
- Click "Save".
- Repeat for each adjudication in the EOB.
Troubleshooting when AngelTrack does not auto-link to a transaction record
If you are inputting a check and expecting AngelTrack to auto-link it to a transaction record which was earlier created for it, but AngelTrack cannot find a matching transaction record, then go to the Check Register and find the expected record by its date or by its check number. Verify that the transaction date, the check/EFT number, and the check amount all exactly match what you are inputting on the Payment Event page.
"NON" Transactions from Insurance Carriers / Zero-Valued Transactions
When an insurance carrier returns a transaction set containing only denials, it will usually include a "NON" remit number, indicating that no monetary amounts were transferred to your bank. AngelTrack records these null transactions in the Check Register anyway, so that you can trace an adjudication back to its remit number.
However, the Check Register's grid will, by default, filters these out, since they have no monetary amount and so would just clutter up your screen when doing a bank reconciliation. In order to see them, just deactivate the filter.
Stripe Transactions
If you are using AngelTrack's Stripe integration to allow customers to self-pay their invoices, all such transactions will appear in your check register as records of type "Stripe".
Each Stripe transaction has a unique ID, called a "payment intent", which acts like a trace number. These unique IDs look like this:
pi_3KrQpjKU467ZQ1cF1Tq4fOPg
When you click a Stripe transaction in the check register to open the Transaction Edit page, it will offer you a link to view the matching data in your Stripe dashboard.
Payment intent IDs versus charge IDs
In Stripe, a "payment intent" is a unique trace number that represents a customer's attempt to pay you -- even if that attempt subsequently fails. Only if the payment is successful does Stripe then issue a charge ID, which looks like this:
ch_2ZbTjrDZ557YL2eU3Po2bLMq
AngelTrack indexes your Stripe transactions by payment intent ID, not charge ID, even though AngelTrack is only recording transactions that are successful. This is because the payment intent ID is what is needed to link to the record in your Stripe dashboard.
Reporting
The Check Register has some handy filters to let you review your historical data, or find specific transactions.
AngelTrack's Report Builder also has a dataset named "Check Register" that can pull all the data for any date range.
That said, most financial reporting in AngelTrack is based on payment events and the datasets thereof, rather than the Check Register, because each entry in the Check Register may link to multiple receivables of various ages, and so payment events are a finer-grained way to visualize your monetary flows.