You can perform dispatching right from the map! This permits your dispatchers to visualize each shift's route over the next few hours. Click the play button to watch a video tutorial about this feature.
Live Map Feature Guide
Here is a screenshot of a typical live map, with purple letters superimposed to point out each feature:
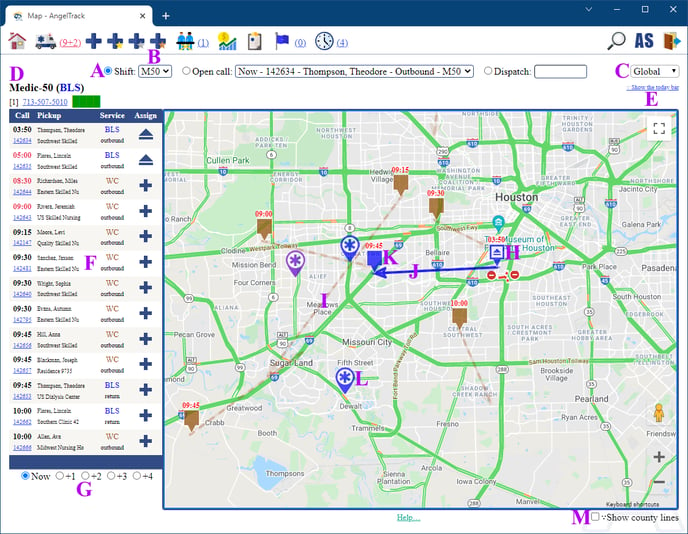
A: The "Shift" radiobutton puts the Live Map into dispatching mode, causing all of its features to appear.
B: The shift selector offers a choice of active shifts. Choose one in order to use the map to perform dispatching for that shift.
C: The zone selector operates normally here. The zone selector only appears if you are using zoned dispatching.
D: Information about the selected shift is displayed, including its service level, patient capacity (in square brackets), estimated fuel level, and the vehicle's mobile phone number if so configured.
E: The 'Today Bar' shows you the case load for the day. (In the screenshot, the Today Bar is collapsed to save space.) Hover your mouse over any dispatch in the Today Bar to highlight it on the map. Any dispatch that is assigned to the selected shift will be over-colored in thin black stripes, allowing you to visualize how the shift's time has been allocated.
F: The grid display the active and upcoming dispatches that the selected shift is qualified to run. From the grid you can ![]() assign the dispatch to the selected shift,
assign the dispatch to the selected shift, ![]() unassign the dispatch from the selected shift, and
unassign the dispatch from the selected shift, and ![]() unassign the dispatch from a different shift (or from an affiliate). Hovering your mouse over any of the aforementioned icons will highlight that dispatch on the map.
unassign the dispatch from a different shift (or from an affiliate). Hovering your mouse over any of the aforementioned icons will highlight that dispatch on the map.
G: The time window selector determines how many hours into the future the grid looks. If the grid looks too far into the future, the map will be very difficult to use, especially for larger operations.
H: This is a dispatch icon; its color indicates the service level (blue means BLS), and the eject symbol indicates that it has been assigned to a shift. The position of the icon indicates its origin address; the time displayed immediately above the icon indicates its activation time (i.e. the time when the crew should go enroute). The activation time turns red once it is in the past.
I: This faint dotted line with arrowhead indicates the route requested, as the crow flies. As with the icons, the line's color indicates the requested service level. The tip of the arrowhead sits on the destination.
J: This bold solid line with arrowhead indicates the route of a dispatch that is already assigned to the selected shift.
K: This is a dispatch icon not yet assigned to anyone (no eject symbol). Click the icon to display a synopsis of the dispatch and a clickable assign/unassign button.
L: This is a crew member icon, displayed in the usual way. The icons of crew members of the selected shift will jump up and down in the map to distinguish themselves from crew members of other shifts. You can double-click any crew member's icon to switch the map to their shift.
M: This tickybox allows you to superimpose county lines on the map, in case you need to check whether you are licensed to operate in the area.
Closing a Completed Dispatch
Once the crew has made their final press of their progress button to indicate they are back in service, the dispatch will be awaiting closure by a dispatcher. You can perform the closure from the map.
To close a dispatch as "Complete, As Ordered", click the ![]() button when it appears in the mini-grid of dispatches.
button when it appears in the mini-grid of dispatches.
To close a dispatch as "Delegated to Affiliate", click the ![]() button when it appears in the mini-grid of dispatches. This choice is applicable only to dispatches that you've assigned to an affiliate that is marked ☑ Progress reports.
button when it appears in the mini-grid of dispatches. This choice is applicable only to dispatches that you've assigned to an affiliate that is marked ☑ Progress reports.
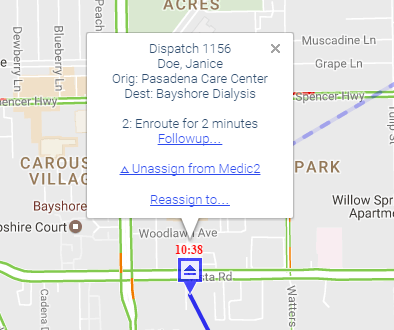
To close a dispatch as "Complete, Best Effort", click the dispatch's pin on the map to display its popup window. From the popup window click "Followup…" to open the Dispatch Followup page, like this: