Most EMS companies have a collections policy which looks like this:
Receivables and Collections Policy
- We will file the claim against the patient's insurance.
- If the claim is denied, or if there is a copay or deductible due, we will invoice the patient.
- If the first invoice is not paid within 30 days, we will invoice the patient a second time.
- If the second invoice is not paid within 30 days, we will invoice the patient a third time.
- If the third invoice is not paid within 30 days, and if no completed hardship waiver is on file, we will sell the receivables to a collections agency.
AngelTrack's invoicing system was designed with this sort of policy in mind, and so will automate most of the process. Simply follow this guide once every invoicing cycle -- once a month, or however often you send out new invoices.
This might be the wrong workflow for your facility contracts
AngelTrack's reinvoicing workflow produces the strings of invoices that are required by your collections agency in order to prove that you invoiced the counterparty a certain number of times. It is probably ideal for your patient invoices.
Your facilities and affiliates, on the other hand, may have different expectations. Consider the following billing arrangement with a nursing home:
- Suppose you place trips 100, 101, 102, and 103 onto invoice #200 for a total balance due of $400, and send it to them.
- They make a payment for $150 which finishes trip 100, pays half of trip 101, and nothing against 102 and 103. Invoice #200 is now in their system as an account payable, showing $250 still owing.
- The next month, you print invoice #200 again, showing the new balance due of $250.
- They make another $150 payment against it, which pays the rest of trip 101 and all of trip 102, leaving only trip 103 unpaid.
- A month later, you print invoice #200 for a third time, showing the new balance due of $100.
- They make a $100 payment, closing out the invoice in their system and in AngelTrack.
...then do not use this workflow. Instead, scroll down to the bottom of this document and review the Alternate Reinvoicing Workflow.
Complete all steps on the same day
Try your best to complete all five steps on the same day, so that you can use the very handy filter named ☑ 0 (today) to simplify the process of printing and mailing.
Do the steps in exactly this order
When you do the following steps in order, AngelTrack's invoice automation features do most of the work for you. You will not need to manually attach or detach any receivables from invoices, nor worry about accidental duplicates.
Step 1: Close Overdue Invoices as Unpaid
From the Invoices List, use the filters to find all open invoices older than 30 days. The filter setting for this are:
- For the Status filter, tick ☑ Open, and untick all other choices.
- For the Age filter, untick ☑ 0 (today), ☑ 1-15, and ☑ 16-30, and leave all other choices ticked.
- You are probably doing this just for your patient invoices, since facilities and affiliates are usually treated differently. If that is the case, then set the Party filter to ☑ Patient.
Your invoices list now contains only those items which are overdue. Close them all as "Unpaid" by doing the following:
- Check the box at the top-left corner of the grid to select all rows.
- Click the "Close as Unpaid or Sold" item in the "Bulk Operations" box. The bulk-close popover will appear.
- Select the "Unpaid" radiobutton if not already selected.
- If adding a late charge, tick the ☑ Add finance charges checkbox, and fill out the finance-charges form. The ∵ symbols on the form indicate that the form will remember your choices for next time.
- If you do add a late charge, and if you intend to re-print and re-mail the closed-unpaid invoices, then tick the ☑ Update the prices printed in the selected invoices to show the new balance owed checkbox.
- Click "Save" to apply the finance charges (if any) and then close all of the selected invoices.
All selected invoices will be marked "Unpaid", and all underlying receivables will go back to "Billing office" where they will be picked up by the invoice generator during the next round of invoicing.
The unpaid invoices will disappear from the list... but of course you can cause them to reappear by ticking the ☑ Unpaid checkbox in the "Status" filters.
Step 2: Check for New Collections Invoices
The Invoice Generators are aware of the number of times each receivable has been invoiced and subsequently marked ☑ Unpaid. Therefore you can switch the invoice generator to ☑ Collections mode, and see whether any receivables have crossed your threshold for transfer to collections.
If there are any such receivables, then the counterparties will appear on the dropdown list; otherwise, the dropdown list will be empty, like this:
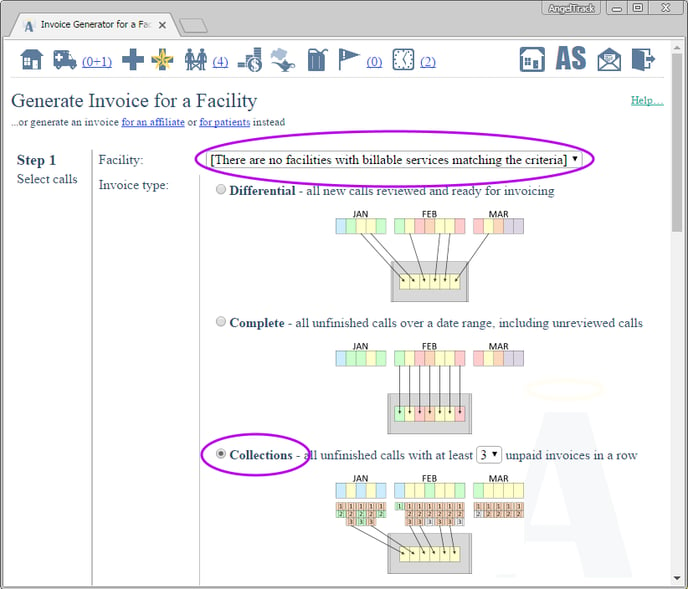
If there are any counterparties, then create the necessary collections invoices.
There is no need to print or mail a collections invoice. In the next step we will export the underlying receivables data in a format suitable for your collections agency.
Step 3: Transfer Eligible Invoices to Collections Agency
From the Invoices List, adjust the filters to show only ☑ Open invoices, and untick all age filters except for ☑ 0 (today) in order to show only those invoices that were committed today. These are the collections invoices that you just created in step 2.
If there might be older collections invoices -- committed prior to today -- then bring them into the grid by ticking some additional age filters, such as ☑ 1-15, and ☑ 16-30, until you are satisfied that any older eligible invoices are included in the grid.
Click the "Times Invoiced" column header two times, in order to sort the grid so that the most-invoiced items are at the top. This column will serve as a double-check that everything being sent to collections has at least three "Unpaid" invoices on file.
If any invoice shows at least "3" in the "Times Invoiced" column, tick the checkbox at the left to select that row. If you selected any rows, then transfer them to collections like this:
- In the "Bulk Operations" box, click "Export data for collections". The exported data will be downloaded to your computer as a .CSV document which is viewable in Microsoft Excel™ or Google Sheets™. This document contains all information needed by your collections agency.
- Save the downloaded .CSV document to your computer in a folder where you can find it later. You will be emailing it to your collections agency.
- Also in the "Bulk Operations" box, click the "Close as Sold" button. The selected invoices will all be marked "Sold", and all underlying receivables will be advanced to Finished , which means they are written off. (Of course you can always pull them back in later if a payment ever arrives.)
The sold invoices will disappear from the list... but of course you can cause them to reappear by ticking the ☑ Sold checkbox in the "Status" filters.
Filling out collections authorization forms
If you must fill out a collections authorization form for each receivable that was sold, you can open the exported .CSV document in Microsoft Excel™ or Google Sheets™ and work your way down the list. Remember you can use the Genie to quickly open any AngelTrack run ticket by its dispatch ID.
You may be able to auto-generate the many collections authorizations forms by using a Mail Merge in Microsoft Word™, driven by data from the .CSV document loaded into Excel. There are countless online guides explaining how to convert a Word document (your collections authorization form) into a Mail Merge.
Step 4: Create New Differential Invoices
Now that your collections-eligible receivables have been transferred out of the system, you are ready to do your regular invoicing for the cycle. In this guide, we will always use differential invoices.
Differential invoices protect you from accidental duplicates. Differential invoices include some protections which complete and custom invoices do not. We recommend using the other types only if you have a specific need, and only if you understand why you need to invoice an item outside of the normal workflow.
To learn how to use an Invoice Generator to create differential invoices, refer to the Invoice Generator guide.
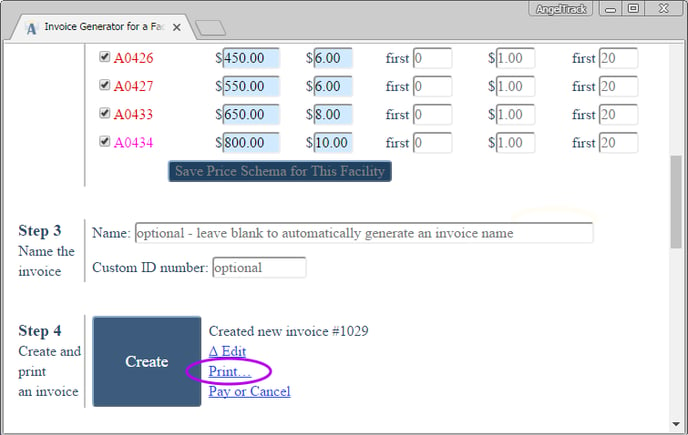
After creating each invoice, click the "Print…" link to open it in a new browser tab for a quick proofread. If everything is satisfactory, return to the browser tab containing the invoice generator and then commit the invoice. You'll recall that committing an invoice causes all of its dispatches to advance to "Awaiting payment", as well as pushes the invoice's prices down to the dispatches' price quote fields.
Step 5: Print and Mail the New Invoices
From the Invoices List, use the ☑ 0 (today) filter to show only those invoices that were committed today. These are the ones you just created in step 4.
Check the box at the top-left corner of the grid to select all rows, then use the "Bulk Operations" box to print all of them. You can also print matching address labels, if you use adhesive address labels instead of windowed envelopes. In that case you must buy sheets of blank address labels in Avery 5160™ size.
Or send them via email
If you wish, AngelTrack can send an invoice over email just as soon as you preview and commit it. To do this, the counterparty's email address must be on file -- in their facility, affiliate, or patient record. The invoice generator will then offer a checkbox ☑ Email a copy to the counterparty after commit.
Repeat the Steps Every Cycle
Whether you send out new invoices every week, or every other week, or once a month, the aforementioned steps are the same. Just follow the steps, in order, each invoicing day.
Always use differential invoices in this process, so that AngelTrack can protect you from duplications.
Using the Express Invoicer
AngelTrack's Express Invoicer was designed specifically for the aforementioned 30-day reinvoicing cycle.
With one click, it can mark all your older invoices "Unpaid", create a new batch of collections invoices for everything ready to go to collections, and then bulk export the data for your collections agency. Then, with another click, the Express Invoicer can create a new batch of differential invoices for any outstanding balances, and bulk print them all for you.
To use the Express Invoicer, click the ![]() icon on the Invoices page. It is a powerful tool, so carefully review its many options before proceeding!
icon on the Invoices page. It is a powerful tool, so carefully review its many options before proceeding!
Sending Back to Insurance After Invoicing
If you have sent out an invoice to a facility or to the patient, only to find out the patient had insurance after all, then detach the affected runs from any invoices at the same time as you send the runs back to insurance.
When detaching, this popover dialog will offer you the chance to change the payor back to Insurance:
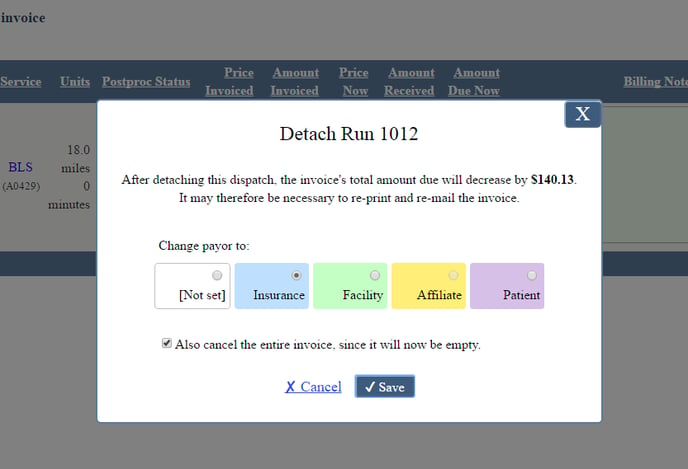
Detaching from the invoice is required for proper aging calculations (e.g. the Patients with a Balance report), which calculate a receivable's age from the date of the first committed invoice. That is why your very first invoice to the patient -- the one that led to the discovery of the patient's insurance -- must be detached, else it will cause the receivables to appear artificially old.
Cancelling the invoice entirely
If you are detaching the last item from an invoice, AngelTrack will helpfully offer to mark the entire invoice "Cancelled". This will usually happen with patient invoices, when patients call to give their insurance information and ask that the invoices be retracted.
In the case of a facility invoice, you will probably be detaching just one or two calls that turned out to be insurable. The rest of the calls will remain in the invoice to be paid directly by the facility. All of this will probably happen simultaneously, when the facility sends you a check for all items in the invoice except for the one or two which they want you to claim against insurance. In this situation, you must detach the insurable items from the invoice first, and then pay the invoice second, so that AngelTrack does not apply the payment against the insurable items.
Automatic Collection Warnings
Whenever an invoice contains any dispatches for which there are two or more previous invoices in a row that are marked "Unpaid", AngelTrack will automatically include a collections warning. The warning advices the counterparty that you will shortly sell the receivables to a collections agency if payment is not received. This warning is legally required in many states.
The warning will go away again if the counterparty makes at least a partial payment against the receivables, as the warning is triggered by the presence of invoices marked 'unpaid'.
If you wish to remove this warning altogether, then untick the relevant checkbox from the "Billing" section of the Preferences page under Settings.
Alternate Reinvoicing Workflow
As discussed above, the aforementioned reinvoicing workflow may be a poor fit for your facility contracts, if your facilities desire that every payable trip appears on a single invoice ID that never changes.
AngelTrack can easily accommodate this request, while you can still use the regular reinvoicing workflow for your patient invoices.
To do so:
- Visit the Preferences page under Settings, find the "Invoice reprint option", and choose ☑Print the current price quote and balance. That will cause AngelTrack to print invoices with their current (up-to-the-minute) price quote and balance, rather than the price quote and balance as they were when the invoice was first generated. Thus, when you re-print the invoices after applying a partial payment or changing a price, the printouts will show the current price and the current balance due. Note that this preference setting will also affect the printing of patient invoices, but that shouldn't cause any problems because you are regenerating them every month anyway.
- When using the Express Invoicer to bulk mark your open invoices as "Unpaid" prior to generating the next round of invoices, exclude your facility invoices and (if desired) your affiliate invoices from that step. You can still use the Express Invoicer to generate any new facility and affiliate invoices; all you are doing is skipping the "mark all existing invoices as unpaid" step, so that they remain open.