As a crew member, you can perform many tasks in AngelTrack, enumerated below.
You can find training videos, quizzes, and training certificates in the Training Portal. Note that the training portal is not attached to any EMS agency, and so you cannot use your normal AngelTrack login credentials; instead, you must create a free user account, which will keep track of your progress and your certificates.
Record Certificates and Licenses
You are responsible for recording (in AngelTrack) all EMS-related certificates you hold... including your driver's license and CPR card. AngelTrack uses these to determine which dispatches you are qualified to handle... and AngelTrack will automatically remind you when any certificate is nearing expiration.
Input and review your certificates using the "Certificates" tab of your Employee Settings page. To learn more about managing your certificates, read the Certificates guide.
Clock-in/Clock-out
You can clock-in and -out from any web browser on any internet-connected device, provided the device is connected to a computer network (wired or wifi) designated as a company-owned network. When so connected, the clock-in/clock-out button lights up and can be clicked; otherwise, the button is disabled. If the clock-in/clock-out button is disabled and you're not sure why, check your device's wireless settings: you may have disabled its wireless connection, or it may have failed to connect to the company-owned network.
Your manager sets restrictions on when you can clock out. You may be prevented from clocking out while you are still a member of an active shift in AngelTrack (you must contact Dispatch and report off-shift), and you will also be unable to clock out if you have unfinished reports and corrections due.
To learn more about the timeclock, read the Using the Timeclock guide.
Run a Call
While running a call, AngelTrack will show you the Run Call page, from which you will perform some or all of the following tasks:
- Use the information table to familiarize yourself with the details of the trip, including warnings about the patient and equipment needed;
- Use the progress button to mark the legs of the trip (enroute, on-scene, transporting, at destination, back in service);
- Use the odometer fields to record the starting and ending mileage of the transport;
- Use the address button to activate your mobile device's streetmap with driving directions for the current leg of the trip;
- Use the Followup page to record the important details of the trip, such as "How patient was moved to ambulance" and "Reason for choosing destination", many of which AngelTrack will attempt to fill in for you;
- For emergent transports, use the "Destination is Notified" button when you have called the destination hospital (at the phone number shown on the button) to give the necessary report;
- If needed, use the "Hospital ER List…" link to summon a list of nearby hospitals, including phone numbers and streetmap links; and if AngelTrack is running in unattended mode, set or change your destination;
- Use the PCR's Signatures tab to collect the necessary signatures, either on-scene or at destination;
- Where useful, use the PCR's History tab to review the patient's prior transports;
- Use the PCR's Documents tab to scan documents (by photographing them with your mobile device's camera) collected during the trip;
- Where required by protocol, use the PCR to record vitals, assessments, narrative, and other elements of a run report; and
- Time permitting, use the "Reports Waiting" links (if any) to work on older unfinished reports.
To learn more about running a call using AngelTrack, read the Run a Call guide.
Finish the Run Report
After running a call, you use the PCR to write the run report (if required), and the Followup page to finish the recordkeeping. For detailed instructions on using the PCR to complete a run report, read the Report Writing guide.
In the PCR, items that are required are shown as bright yellow ; items probably needed are shown as dark yellow ; all other tabs stay the normal blue . The coloration is controlled by the Patient Disposition field on the Followup page: the recordkeeping requirements depend entirely on what was ultimately done to the patient, so some tabs will not turn yellow until the Patient Disposition is set.
When all recordkeeping is finished, press the Submit to QA button to send the report onward. That button will appear at the upper-right corner of the PCR's ribbon once the minimum required recordkeeping is finished.
For a Wheelchair Van transport, AngelTrack will automatically complete the report and send it to QA when all of the following are provided by the crew:
- reasonable leg times (meaning: you pressed the progress button at the correct times);
- odometer readings consistent with the travel time; and
- all necessary signatures (the PCR's Signatures page automatically opens whichever signature form is probably needed).
Consequently, a wheelchair driver who is careful with his progress button presses, odometer readings, and signatures, will never need to manually complete a report or send it to QA; AngelTrack will do it all automatically.
Scan and Attach Paper Documents
You must know how to scan a paper document and attach it to a dispatch. You can scan using an ordinary computer scanner, or you can photograph the documents using your mobile device's camera.
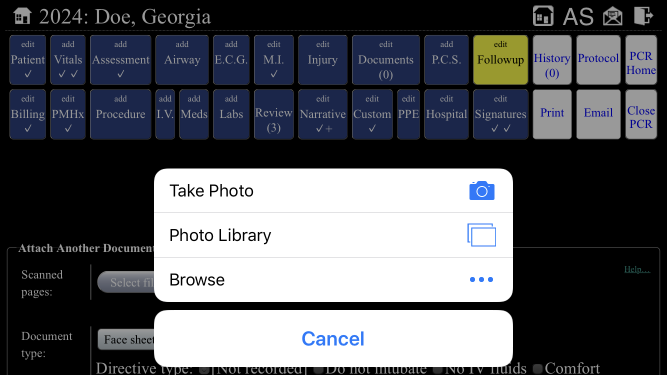
PCS forms can be attached right from your "Reports not yet graduated from QA" list on your Crew Home page. All other documents are attached by opening the PCR for the relevant dispatch.
To learn more about scanning and attaching documents, read the Document Upload guide.
Check Upcoming Dispatches
If your company pre-assigns the day's work, your work list appears on your Crew Home page. For each assigned dispatch, you can read the activation time, patient name, pickup time, and origin and destination addresses. The addresses are links that you can click to open a street map for driving directions and traffic information.
Complete Assigned Checklists
If your shift has any checklists assigned, they will appear in a list on your Crew Home page. Unfinished checklists are highlighted in yellow. Click the checklist's name to open the form and begin filling it out.
It is not necessary to complete an entire checklist in one sitting. You can save your work, as "unfinished", if you intend to return later to finish it.
Your supervisors can run reports showing how completely you fill out your checklists.
Review Recent Dispatches
Your Crew Home page lists all recent dispatches that you performed -- including calls initially assigned to you but then handed off to a different crew. The "PCR" and "Followup" links lead to the relevant pages, so that you can complete any necessary reports.
If you are the attending crew member for a call whose report is unfinished (or has failed QA), the call will be highlighted in yellow. If someone else is the attending, but you wish to complete or correct the report yourself, the Followup page gives you the option to become the attending.
A call will also be highlighted if its report is unfinished (or has failed QA) and there is no attending assigned yet. It appears in highlight on the Crew Home pages of every crew member who played a part in running the call, prompting someone to declare themself the attending and complete the report. (AngelTrack auto-assigns the attending to the first crew member to open the PCR for the call; if nobody opened the PCR, then no attending will be set yet.)
Submit a Ticket
If your company uses AngelTrack's ticket system, then every employee regardless of position has the ability and the duty to report incidents. Report them as soon as they occur, while the memory is still fresh.
In the "blame" section of the ticket form, specify all of the entities who caused the incident. This may include the vehicle (if reporting a mechanical breakdown), or the facility (if reporting a suspected case of patient abuse), or an employee (perhaps even yourself) and their supervisor, etc. You do not need to assign blame right away, if the cause is not yet clear.
You can also attach a photo, or an image of a scanned document. You can even use your mobile device to take a picture; with most mobile devices, pressing the "Choose" button on the AngelTrack web-page will activate the device's camera or photo album. Take a new picture or choose an existing one for direct upload into AngelTrack.
If unsure who should respond to your ticket, don't assign it to anyone. By leaving it unassigned, it will appear for triage by all company supervisors; they will assess the ticket and assign it to the appropriate employee.
Manage Assigned Tickets
If you have any tickets assigned to you, you Crew Home will contain a red warning prompt. Click the warning prompt to view your list of assigned tickets. The list will show you all tickets that are assigned to you, as well as tickets that are assigned to others but still readable by you.
Record a Fuel Purchase
If you refuel a company vehicle, record the event using AngelTrack, using the "Log vehicle fuel I purchased" link shown on the Crew Home page. You will be prompted to enter the date of fueling (pre-loaded with today's date), the vehicle (pre-loaded with your currently assigned vehicle), the quantity of fuel purchased, and the amount of money paid. As you input the latter two pieces of information, AngelTrack calculates the cost per gallon so as to help you spot a typographical error: if the miles per gallon seems wrong, double-check the numbers you input.
You can also specify the location of the fueling station, if your company requires it.
AngelTrack will also allow you to attach and upload an image of the receipt. You can scan a paper receipt later and attach the image, or you can use your mobile device's camera to photograph the receipt right at the gas station. Or just photograph the fuel pump when it displays the final purchase amount.
Report Vehicle Damage
If you notice -- or cause -- new damage to your assigned vehicle, use the Vehicle Damage Card to report it. The card has a section for each part of the vehicle, showing known damage to that area. Each section of the card also has a ![]() plus sign: click it to report new damage to that area of the vehicle.
plus sign: click it to report new damage to that area of the vehicle.
When filling out the report, you can use your mobile device's camera to include a photo of the damage.
AngelTrack will present your damage reports to your supervisor(s) for review and further action.
If you are assigned to a new vehicle, one which you have not driven before, make a careful inspection and report all damage found, however minor. By doing so, you protect yourself from blame for pre-existing damage.
Record Vehicle Maintenance Performed
If you perform any maintenance on a company vehicle, record it in AngelTrack, using the "Log vehicle maintenance I performed" link shown on the Crew Home page. You will be prompted to enter the date performed, the vehicle, the vehicle's mileage (pre-loaded with the latest odometer reading known to AngelTrack), and the type of maintenance performed.
When recording a maintenance event, you can specify the "Location" of the maintenance. For most events, no location is necessary; for example, an oil change always happens to the engine. Some maintenance events do require a location though: tire changes, for example, must specify which tire was replaced. In such cases, set the "Location" field to the value which best describes the location of the item replaced or serviced.
Edit Personal Settings and Signature
To edit your employee settings, including your full name, password, preferred station, mobile phone number, email address, messaging preferences, and so on, click your initials -- shown as a link in the upper-right corner of all AngelTrack pages.
The "Edit my employee settings" link on your Crew Home page does the same thing.
Review Performance Statistics
In your Employee Settings page is a tab named Statistics. Select the tab to view your employee statistics, including hours worked, punctuality, absences, call volume, QA performance, and other metrics. The date-range controls on that page allow you to view your statistics for any time period you wish.