Running a call using AngelTrack on your mobile device is straightforward and easy. AngelTrack's web pages are slim -- using minimal graphics and scripting -- so that they will load and run quickly on all smartphones, phablets, and tablets. If you are in an area with poor internet service, you can also use the Offline PCR; these same instructions will apply.
Call Assignment
When your dispatcher assigns a call to you, AngelTrack will let you know in several ways:
- You will receive an email or text message, if you have configured your messaging settings.
- If you are viewing AngelTrack's Crew Home page, then it will automatically switch to the Run Call page, where you can mark yourself enroute.
- If you are viewing any other page in AngelTrack's crew areas (pages with black backgrounds), a warning link will appear at the top of the page:
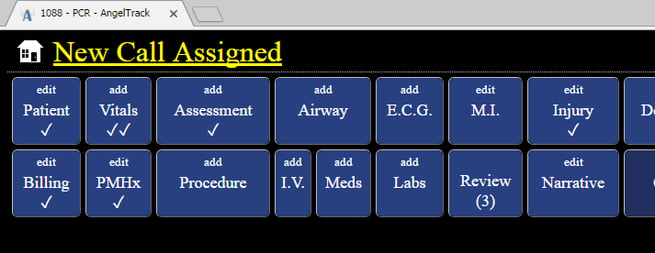
- If you are using AngelTrack's office areas (pages with white backgrounds), the crew-home icon in the upper-right corner
 will begin to blink.
 - If you are running the Offline PCR, and if it has an internet connection, it will switch to its Run Call page.
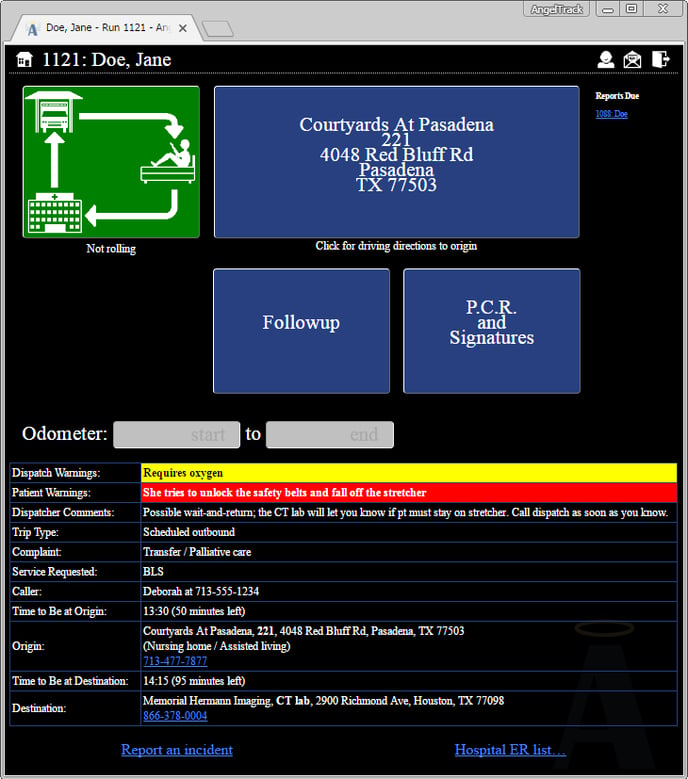
The Run Call Page
This is the Run Call page, which tells you all you need to know in order to go enroute:
When you are sitting in your vehicle and ready to roll, press the large green progress button to mark yourself enroute.
If you are headed into an area with poor internet service, then this is the time to switch to the Offline PCR by clicking the satellite icon ![]() .
.
If you have already configured your AngelTrack preferences to auto-launch the offline PCR upon going enroute, then it will launch for you as soon as you mark yourself enroute.
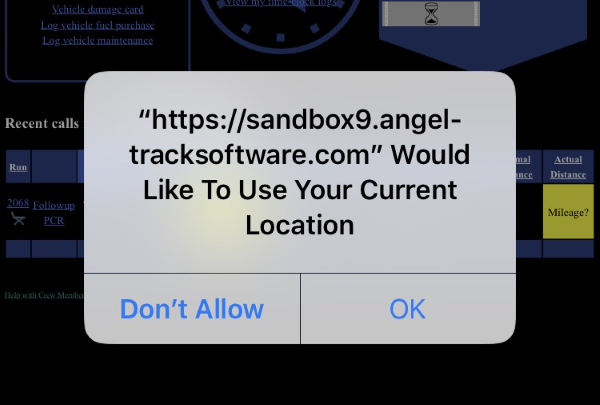
Location Tracking
AngelTrack will automatically note your GPS location as you run the call and use the PCR. This information proves where you were at the time you went enroute, arrived on-scene, et cetera. But for it to work, you must answer yes when the web browser in your mobile device asks:
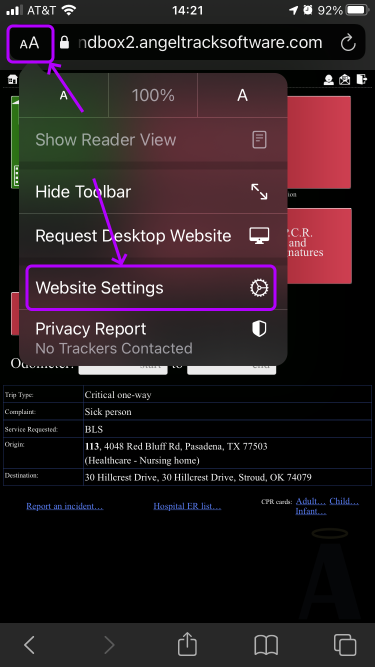
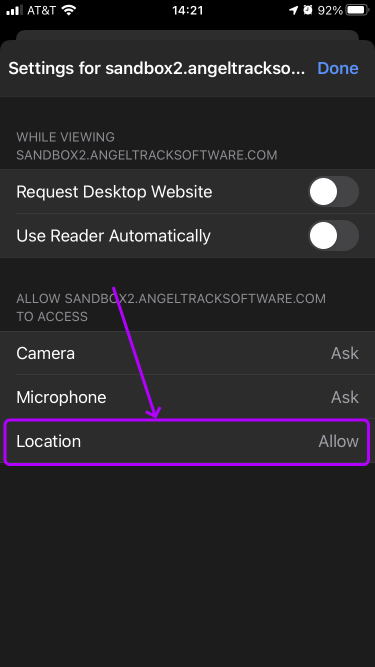
If Safari keeps asking and won't stop
Normally your browser will ask once or twice, and then allow AngelTrack to thereafter know your location. Safari on iOS, however, must be specifically configured to trust AngelTrack. To do this, click the "aA" icon on the upper-left corner of the screen, then select "Website Settings", then change "Location" to "Allow", as seen here:
Review Call Parameters and Warnings
The bottom half of the Run Call page contains a chart of the call's parameters, including trip type, origin and destination addresses including telephone numbers, warnings, and scheduled pickup times. Take a moment to look over the chart to make sure you and your vehicle are prepared for what's ahead, and to cross-check the instructions you received from dispatch versus what is in AngelTrack.
Patient warnings -- reported by crews during prior calls -- are shown in red. Dispatch warnings -- such as "ECG required" -- are shown in yellow.
If you are expected to collect a cash payment while on-scene, the total to be collected will appear in the chart in green... and you will be prompted to do so when you arrive on-scene and again when you arrive at destination.
Log Your Progress
As you run the call, use the progress button to mark each leg of the journey:
| Not rolling | → | Enroute | → | On-scene | → | Transporting | → | At destination | → | Back in service |
| push button | push button | record odometer push button |
record odometer push button |
push button |
You will push the large green progress button to mark each leg of the trip.
Your dispatcher can do it for you, if necessary
Your dispatcher can advance your progress, if your mobile device is malfunctioning or cannot find a signal. However, calling dispatch for this purpose is typically used as a last resort.
Fire calls / Catch-and-release calls
If you are dispatched for a non-transport service like a fire call, or if you are dispatched for a transport but no destination is yet chosen, then AngelTrack assumes the call will be catch-and-release. The progress button punches therefore work like this:
| Not rolling | → | Enroute | → | On-scene | → | Back in service |
| push button | push button | push button |
If while on-scene you decide to transport, then phone your destination to your dispatcher before you push the progress button to mark yourself back in service. Your dispatcher will input the destination into AngelTrack. Afterward, your Run Call page will change:
- The starting odometer field will light up
- The destination address will appear, and can be clicked to load the address into your mobile device's mapping application
- The progress button will change to show a destination leg
Wait for this update to occur before clicking the progress button to mark yourself transporting.

ETA buttons
While you are enroute, AngelTrack's Run-Call page will show you a selection of ETA buttons, so that you can report an ETA to the dispatch office.
Once you've reported an ETA, as that time draws nearer, AngelTrack will highlight different ETA buttons to reflect the current time estimate. You can push additional ETA buttons as often as you like to update your ETA.
Your ETA will appear on the dispatch board for your dispatchers to see, and it will also appear in the Customer Portal for the facility to see. But it is only an estimate, so it does not get reported to the state and it does not play any role during QA or billing.
Odometer Readings
While you are on-scene and about to begin transporting, AngelTrack will prompt for an odometer reading. You can enter it and then save it by pushing the progress button, or you can enter it later (perhaps using the vehicle's trip odometer). Likewise when you arrive at the destination, and are preparing to press the progress button to record the event, you will again be prompted for an odometer reading.
When both odometer readings are entered, AngelTrack calculates the transport mileage. If the transport mileage seems wrong, or a question mark is displayed, then check your odometer entries for a typo.
In any case, it is never necessary to use AngelTrack while driving the vehicle: all button presses and other data entry is meant to be done while parked, right before or right after driving. We strongly advise against performing any tasks in AngelTrack while driving.
Odometers for non-transport services
Some non-transport services -- like fire calls, inspections, well-person checks, and standby events -- may nevertheless be billable, and therefore may need to collect the odometer readings for your enroute leg (i.e. for the distance between your station and the scene). If AngelTrack is so configured, then the Run Call page may ask for your odometer when you are preparing to go enroute, and again when you arrive on-scene.
Get Driving Directions
The large map button always shows the address where you are headed next... be it the origin, or the destination, or your posting station.
When the map button is pressed, it activates your mobile device's mapping application, which AngelTrack will preload with the necessary route. If your device does not have a streetmap feature, then the button will open Google Maps in a browser window instead.
AngelTrack will pre-load the route, always beginning at your current location as determined by your computer's GPS device. If your computer does not have a GPS, or the GPS is disabled, then the route will begin at your posted station.
While on-scene and at destination, the map button's text changes to show other information, including the door code (if any), the patient's room or floor (if any), the need for a PCS form (if any), and the cash payment to be collected (if any)... but the button still works the same, activating your computer's streetmap when pressed, showing the route of the next leg to be travelled.
Review the Origin's Fire Preplan
If the origin site has a fire preplan on-file in AngelTrack, then a large link will appear that says, "This location has a preplan". Click the link to view the preplan.
Nearby Fire Hydrants
If you are enroute or on-scene for a fire call, the Run Call page will show you the list of nearby fire hydrants -- including distance, direction, and bonnet color.
This handy feature requires AngelTrack's fire hydrants list to be populated. If the Run Call page never shows you any nearby fire hydrants, then ask your supervisor to import your area's list of hydrants.
AngelTrack also shows the nearby hydrants to your dispatcher, so she also could tell you where to find the nearest one.
Identify the Patient and Create or Attach Their Record
For an EMS call, if your dispatcher has not yet identified the patient and attached their record to the PCR, then you must identify the patient and see if they already have a record in the system. When you first open the PCR, AngelTrack will prompt you to do this.
You can identify the patient using any of the following methods:
- Perform a name search. If you find their record, click to attach it.
- Use your mobile device to photograph the back of the patient's driver's license, and then click the "Scan a License" button to send the photograph to AngelTrack. AngelTrack will scrape the demographic data from the 2-D barcode on the back of the license. Using that data, it will find and attach any matching patient record, otherwise it will create and populate a new patient record for you.
- Use your mobile device to photograph the patient's identity bracelet or token or ticket, and then click the "Scan a Bracelet" button to send the photograph to AngelTrack. AngelTrack will search its records for any patient with that barcode; if no match is found, then it will create a new patient record for you.
To learn more about barcode scanning, refer to the Barcode Scanning Guide.
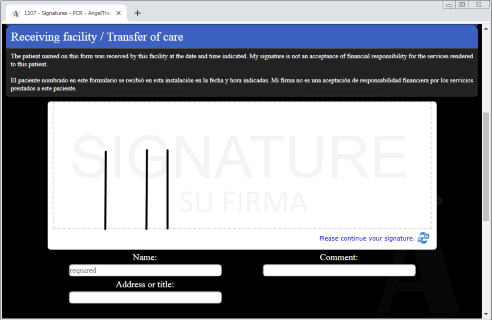
Collect Signatures
Most transports will require at least one signature -- during patient dropoff. Signatures are collected inside the PCR; press the "Patient Care Records" button to access the PCR, and then choose the Signatures tab. AngelTrack will select and open the signature form it believes is most likely to be the one needed... but you can select whichever combination of forms is correct.
AngelTrack has internal rules about the minimum required signatures for different services provided. Read the Signatures guide to learn more.
If you attach a "Auth/XFer signatures" document to the dispatch, then it counts as both the "Payment authorization" and the "Receiving facility" signature forms.
You don't need a wifi/internet connection to collect signatures. Read the Using AngelTrack Without a Signal guide to see how, or use the offline PCR.
Problems on ToughBooks and other Windows tablets
If you attempt to take a signature but all you get is vertical lines or dots:

...then have a look at the Touchscreen Signature Problems guide.
Find an Emergency Room
If your destination is a hospital ER, and that ER is found to be on divert, you may need to scramble to find another ER. AngelTrack provides a list of hospitals that have emergency rooms; open the list using the red "Hospital ER list…" link at the bottom of the Run Call page. This list is based on the pre-loaded facility list; it is important to load a facility list for this feature to work. Contact your supervisor if no facilities are configured.
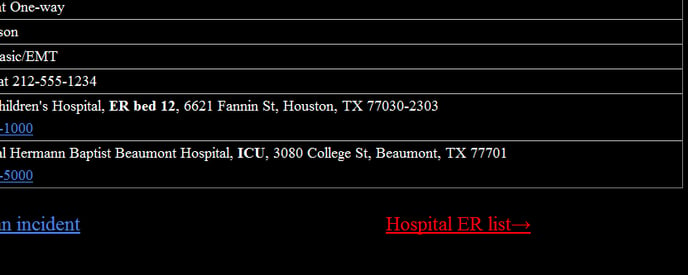
The street addresses shown in the list are clickable, activating your computer's streetmap feature to show you the route. Likewise the phone numbers are clickable, if your computer is a smartphone or has VoIP software installed.
If the list is very long, you can use the filter controls at the top to pare it down.
If you have Call-taker or Dispatcher privileges, or if AngelTrack is in unattended mode, you can use the ER list to set or change your destination, by clicking the "Set as Destination" buttons that will appear when eligible.
Add Followup Information
The Followup page is where you record the logistics information about the trip, including leg times, odometer readings, driving priority, how the patient was moved, type of destination, and so forth.
The leg times are filled in as you press the progress button at the appropriate times. AngelTrack attempts to fill in most of the other fields for you.
Use the PCR to Write a Report
If you are performing a BLS or ALS transport, or conducting a telemedicine visit, you will use the PCR to compose the report. The large "Patient Care Records" button opens the PCR for the current call; you can also open the PCR for older calls, when such links appear in places like the "Reports Waiting" list.
To learn more about using the PCR to write an EMS report, read the EMS Report Writing Guide.
To learn more about using the PCR to write a fire (NFIRS) report, read the Fire Report Writing Guide.
Fax Your Report to the ER or to the Nursing Home
If your mobile device has fax-over-internet software installed, you can use it to fax your run report right from AngelTrack.
This requires fax-over-IP or VoIP software on your mobile device. The software must interact with the mobile device so as to be available for opening .PDF documents, as that is what AngelTrack will send when you click the "PDF" button. Here is an example of the RingCentral VOIP app receiving an AngelTrack report .PDF for faxing:
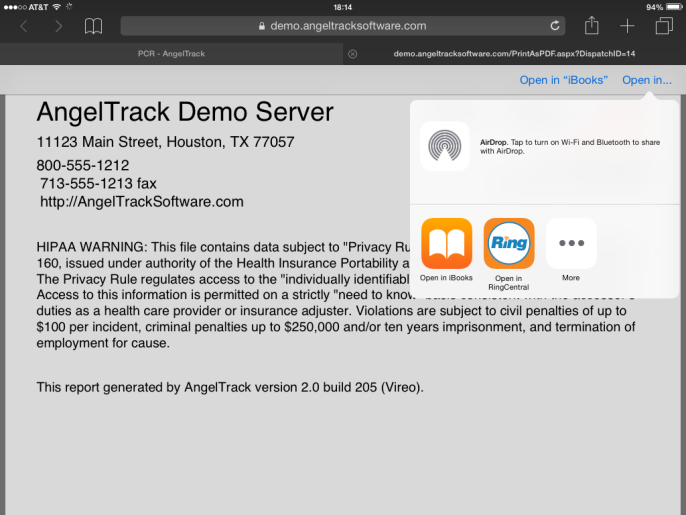
On iOS devices, you must click "Open in..." to activate your VoIP app.
There are too many fax-over-IP and VoIP apps to keep track of, so AngelTrack LLC does not vet any apps or guarantee compatibility. Luckily many of them are free or nearly-free. You may need to try several until you find one that works well with your particular mobile device.
The "ER Dropoff Report"
The "Print for ER" button will download a two-page ultra-compact report that summarizes the most pertinent PCR information. It is probably the best choice for quickly communicating a lot of data in a small number of pages.
Email Your Report to the Origin, Destination, or Patient/Customer
If the origin facility, destination facility, or the patient has an email address on-file in AngelTrack, then the PCR will offer you the option to email your report right to them. You don't need an email address for this; AngelTrack does the emailing for you, using a HIPAA-compliant email provider.
For the patient email address, crew members can input it using the "Patient" tab of the PCR. For the origin facility's and destination facility's email addresses, a dispatcher must input those.
Submit a Ticket
If a reportable incident occurs during the call, press the "Submit a ticket" link, at the bottom of the Run Call page. The ticket form will appear, with the dispatch ID and the date/time already filled-in for you. To learn more about using the ticket system, read the Ticket System guide.
After saving the form, you will be returned to the Run Call page.
Work on a Checklist
If you have an unfinished checklist for the vehicle, it will appear as a bright yellow link, so that you can work on it if you have spare time during the call.
The checklist link appears until the checklist is completely filled-out and saved as finished.
Work on an Incomplete Report
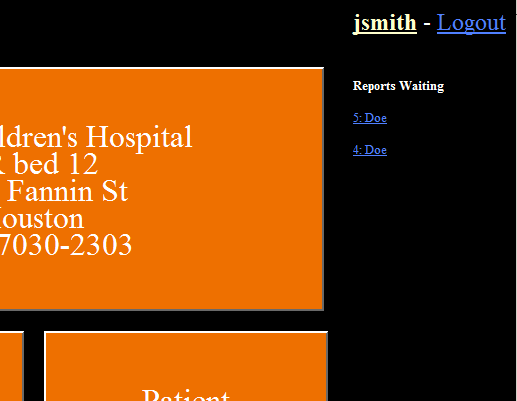
If you have any reports unfinished or awaiting corrections, they will appear in a "Reports Waiting" column to the right of the run-call buttons. Each entry in the column shows the run ID and the patient's last name:
Click any entry to open the PCR for that call. At any time, you can close the PCR and return to the current call.