Before you continue, be sure you already understand the following:
- the basic dispatch guide,
- the emergent dispatch guide, and
- the explanations of the following dispatch concepts:
Preassign a Future Call
Some EMS operations elect to preassign the day's scheduled calls, leaving it up to the crews to go enroute at the appointed time. With AngelTrack you can continue to dispatch your crews in this manner.
To preassign a future call to a crew unit, visit the Scheduled Dispatches page. Select a call and then click the '[Unassigned]' link, which opens the Dispatch Assignment page.
On that page, the "Now" button will assign the call to the selected crew unit and change the call's activation time to now. The "Later" button, by contrast, is for preassignment: the call will be assigned to the crew unit, but the activation time will remain in the future.
Crew members can view the list of calls preassigned to them by visiting their Crew Home page.
AngelTrack will estimate which shifts can handle the call
When you preassign a future call, AngelTrack will show you a grid of all shifts that can handle it. In building this grid, AngelTrack considers all of the following:
- The effective service level of the shift, which is calculated from:
- the max service level of the vehicle,
- the current patch levels of all crew members onboard, and
- the CPR certificates held by the crew members (if your state requires this).
- The time left on duty, before the shift is scheduled to end. This is set by the dispatcher when starting a new shift.
- The calls already assigned to the shift, including their estimated runtimes. Every vehicle has a configurable patient capacity; by default ambulances and cars carry one patient at a time, wheelchair vans carry two.
Consequently, AngelTrack will show you only those shifts which are legally qualified to run the call, and which have time to complete the call before going off-duty, and which will have room for the patient during the call's timeframe.
You can override any of these constraints by unticking the various "Hide shifts that..." checkboxes next to the grid:
☑ Hide shifts that are fully loaded
☑ Hide shifts that are not qualified for this type of call
☑ Hide shifts that are scheduled to end before this call finishes
By removing one or more constraints, you can see other shifts that might be able to field the call.
Preassigning future calls to future shifts
If you are using AngelTrack's crew scheduler to book your shifts in advance, then you caneasily preassign future dispatches to those future shifts.
Future shifts appear as choices in the Dispatch Assign page, if their scheduled time overlaps the call's anticipated runtime. Simply click the "Later" button to preassign the trip to them. To learn more, refer to the Scheduled Shifts guide.
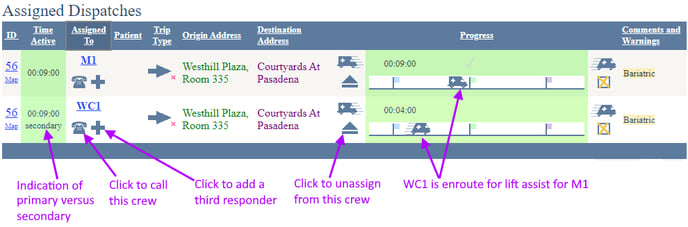
Add a Second Responder to an Active Dispatch
To add a second crew to an active dispatch, as additional responders, just click the ![]() icon that appears in the dispatch board's "Assigned Dispatches" grid next to each currently-assigned unit. A popover will appear, showing the shifts that are available to join the response.
icon that appears in the dispatch board's "Assigned Dispatches" grid next to each currently-assigned unit. A popover will appear, showing the shifts that are available to join the response.
You can even add a third responder, fourth responder, fifth responder, as many as you need.
To learn more about multiple-response calls, read the Multiple Responders guide.
Reassign an Active Dispatch to a Different Crew
It is easy to reassign an active dispatch to a completely different crew. From the Dispatch Edit page click the "Assigned To" link in the upper-left; or from the dispatch board's "Assigned Dispatches" grid, click the name of the currently-assigned crew.
The Dispatch Assignment page will open, and show you the crews which are available and qualified to take over the call, same as if you were assigning the call for the first time.
If the initial crew has already gone enroute, then a ☑ Clear progress when reassigning to a different unit tickbox will appear. Untick the box if you wish to discard the initial crew's leg times so that the new crew will be starting from scratch; leave the box ticked if the new crew will be replacing the initial crew in situ and therefore the initial crew's enroute and on-scene times should be preserved.
If the original shift did arrive on-scene before being pulled off, its crew members will remain attached to the dispatch, and thus will retain access to the PCR. AngelTrack does this because anyone who arrived on-scene may have valuable information to contribute to the report.
Duplicate an Earlier Call
When a caller says "I need to book a call for John Doe, he's going the same place he went last week," AngelTrack can save you a lot of typing. Simply switch to the Closed Dispatches list, input the patient's last name, and pull up the list of matching dispatches. Find the one that the caller is referring to, and click its Dupe link.
AngelTrack will then create a new dispatch and fill in most of the fields for you; you need only add the caller's name, the new pickup date, and the activation and pickup times.
Sometimes the caller doesn't say "He's going the same place he went last week." until you are halfway through creating a new dispatch. In that case, once you attach the patient to the new dispatch, click the patient's name to open a window showing all the patient's records. Select the History tab, scroll down to the relevant dispatch, and click the Dupe link. You can then fill out the remainder of the duplicated dispatch, and discard the new dispatch you were initially creating.
"Split" / Duplicate a Live Call for a Second Patient Found On-Scene
If your 911 crew discovers a second patient on-scene, and they want to start a chart for that patient (whether or not they eventually transport), you can easily split their current dispatch, using the "Split" option from the Dispatch Edit page. This will create a second dispatch with everything the same as the first, except no patient attached. The second dispatch will already be assigned to the same crew and will already place them on-scene. All they must do is attach a patient record.
Use Bookmarks to Speed Up Repetitive Bookings
If you book a lot of dispatches that are very similar, but not identical enough to be a recurring dispatch, you can use browser bookmarks (aka favorites) to speed up the process.
To do so, go to Closed Dispatches and find a call that represents the sort you are often asked to book. Click the "↻ Dupe" link to open the Create Duplicate Dispatch page. Now create a bookmark (aka "Add to Favorites") of the page, but don't click the "Save" button.
Once that's done, you can visit the bookmark any time you want to book a new dispatch with those fields already filled-in. You can do this for dispatches from a certain origin, or for a certain origin + destination, or for a certain patient... whichever closed dispatch you choose to bookmark. You can create such a bookmark for each of your contracted facilities, and maybe for each of your frequent-flier patients.
Let AngelTrack Run the Dispatch Board for a While
If you need to step away for a few hours, or if someone calls in sick, or at night, AngelTrack can run your dispatch board for a while, using its Vertex AI to solve the remaining schedule and then allocating calls to appropriate shifts.
To learn more about this, please visit the Vertex Self-Drive Guide.
Assign Overlapping Calls to a Crew Unit
Suppose a crew unit is transporting to a nursing home, and at that nursing home they are scheduled to pick up a new patient once they drop their current patient off. We recommend assigning the second call to the crew at the same time as they begin transporting the first call. The crew will then mark themselves (or a dispatcher can mark them) enroute for the second call while simultaneously transporting the first call. Consequently, the leg times for both dispatches will accurately reflect the travel time of the crew.
The Live Map is good at finding overlaps, if you switch it into "Shift Mode". That mode will allow you to perform dispatching right in the map. To learn how, read the Dispatching from the Live Map Guide.
Your ability to find and exploit overlaps and double-loads is one of the most important metrics for a dispatcher, and it appears as one of the performance measures on the Dispatcher Efficiency Report.
Properly Close a Dispatch When the Crew Finds No Patient Onscene
When a crew shows up onscene to collect a patient, but the patient is not present, it is often due to a clerical error and the facility. In these cases, the facility ought to pay the pickup charge (but not a mileage charge) for the crew showing up. Additionally, the Billing department should be advised of what happened, in case they are asked to explain a pickup charge with no subsequent transport or return-trip.
Best practice in this situation is to close the dispatch as "Completed, best effort", and set the "Patient Disposition" to "Cancelled onscene, no patient found" or other relevant value. The "best effort" flag then serves to warn the Billing department that this dispatch did not go as planned, and therefore it most likely should not be billed in the usual way.
In order to perform the aforementioned recordkeeping, close the dispatch using the ![]() button, rather than the usual
button, rather than the usual ![]() button.
button.
Or you can click "Followup", and use the Followup page to close the dispatch as "Completed, best effort" and specify an appropriate Patient Disposition. If you opt not to do this, then it is up to the crew to set the Patient Disposition field. AngelTrack will then double-check that the value they choose is consistent with the dispatch's "best effort" status, and prompt them if there is a mismatch.
If you opt to set the value as "Cancelled on-scene, no patient found", AngelTrack's PCR will automatically know that most of the usual patient-care exercises are unnecessary, and so will allow the crew to submit their report to QA without vitals, assessments, signatures, and the like.
We also recommend dispatchers review the Call Completion Guide, in order to be absolutely clear on how the different methods of closure affect the path that a dispatch follows during postprocess.
Close a Dispatch When a Patient Must Be Immediately Returned
Sometimes a crew and patient arrive at their destination, only to discover that the appointment was cancelled, or the patient cannot remain there alone, or the patient refuses and demands to be taken home. In this situation, you you may consider leaving the dispatch open, ordering the crew to return the patient home, and recording odometer readings for the entire round-trip.
We strongly recommend against this, and recommend the following:
- Close the outbound call as "Complete, best effort" as described above, with mileage recorded, and add a comment to the Dispatch/Billing notes explaining what happened.
- Immediately assign the return-trip to the crew unit. AngelTrack will recognize that they are already on-scene and so will mark them as such. The crew then loads the patient back up if necessary, presses the progress button once to mark themselves transporting, and transports the patient back.
- When the crew reports they are finished and back in service, close the return-trip dispatch normally.
These actions will result in two full billable transports: the outbound trip, with pickup charge and mileage, marked "best effort" to indicate something went wrong; and the return trip, likewise with pickup charge and mileage, marked "as ordered". The Billing department -- alerted by the "best effort" flag -- can then decide which charges to waive, if any.
Break a Wait-and-Return Call Into Separate Trips
A wait-and-return dispatch can be split into a normal two-dispatch round-trip by doing the following:
- From the dispatch board click the dispatch's ID number to open its Dispatch Edit page, and untick the Wait-and-return checkbox. Then click the Save button.
- Edit the dispatch again, and in the return-trip window at right, click the "Create one now" link. AngelTrack will then automatically fill out most of the fields in the return-trip dispatch; you can just set the caller name and perhaps the arrival times.
Change a Round-Trip into a Wait-and-Return
At any time you can designate a round-trip as a wait-and-return: Simply open the run ticket, select the ☑ Wait-and-return tickybox, and then save. Once that's done, AngelTrack will treat the two trips exactly as any other wait-and-return.
To learn more, refer to the Wait and Return Guide.
Detail a BLS Crew Member Onto a Wheelchair Van
A crew member can belong to multiple active shifts, if desired. Therefore, when it becomes necessary to temporarily assign a BLS crew member to a wheelchair van, we recommend against removing him from the BLS shift. Instead just create a new shift, with him alone in the wheelchair van, and assign the wheelchair dispatch to the new shift.
Whenever he finishes and climbs back into his ambulance, end the wheelchair van shift in the usual way.
Be wary of the implications of having a crew member assigned to two different active dispatches, and it may raise a red flag during an audit.
Send an ALS Intercept to a BLS Call
When an ALS unit is sent to intercept a BLS unit, AngelTrack provides three different ways to record the fact, depending on circumstances.
Adding the paramedic as a secondary responder
If the paramedic is in a shift of his or her own, such as a quick-response vehicle, you can assign their shift to the dispatch as a secondary responder. The dispatch board offers buttons to easily add responders to an active call:
To learn more about secondary responders, read the Multiple Responders guide.
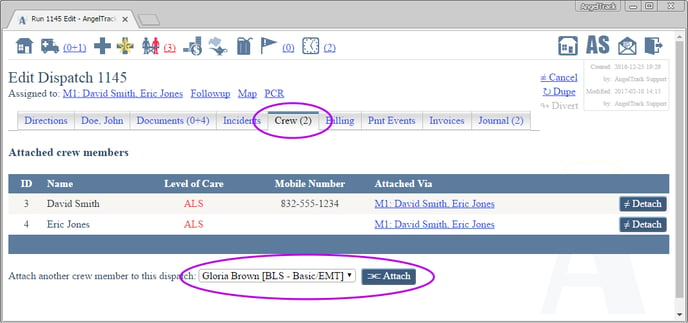
Manually adding the paramedic as a crew member for the dispatch
If the paramedic is not in a shift of his or her own, and will not be remaining with the crew after the trip, we recommend adding the paramedic to the dispatch rather than to the shift. To do so, open the dispatch's Dispatch Edit page, select the "Crew" tab, and add the paramedic to the list.
Adding the paramedic to the shift
If the ALS crew member will be remaining with the crew after the trip, accompanying them to additional calls, we recommend adding the ALS crew member to the shift. To do so, open the Shifts page, click the ID number of the relevant shift, and add the ALS crew member. By adding the ALS crew member to the shift, AngelTrack will then automatically add the ALS crew member to all of the shift's active dispatches too.
Once that's done, the active dispatch will pop up on the ALS crew member's tablet/smartphone, so that he or she can use the map to find their way to the scene. He will also then be able to mark on-scene if he arrives before the BLS unit.
Make Confirmation Calls to Facilities
To quickly confirm tomorrow's scheduled calls, open the Confirmation Queue, accessible from the Dispatch Home page.
There you will see tomorrow's schedule, sorted by facility, with each facility's phone number shown. (If you don't see phone numbers, then edit your facility records and add them.) You can simply go down the list, calling each facility and reviewing the schedule; use the add-note button to record a confirmation, and use the Cancel link to cancel.
To learn more about making and reviewing confirmation calls, read the Confirmation Calls Guide.
Book Transport for a Patient Under a Hospice Contract
When a patient is covered by a hospice contract, it's likely that all of their transports are billable to the hospice agency -- even if the patient does not reside at the hospice agency. It is up to your billing department to determine what should be billed.
AngelTrack automates a portion of the billing work in this situation, provided you set the dispatch's bill-to fields appropriately. The call may be eligible for insurance, but to bill the facility as well, you must also check the ☑ Bill facility box and then choose the hospice facility from the list of billable facilities.
If you do not see the hospice agency in the list of billable facilities, then you must designate the patient a resident of the hospice facility in AngelTrack. You can set the patient's residence right in the Dispatch Create page using the popup patient editor, just click the ![]() icon.
icon.
Leave Notes About Confirmations, Changes, and Exceptions
When something goes wrong, to ensure the most accurate records, especially for billing purposes, we strongly recommend you you need to document it immediately. AngelTrack provides dispatchers with several different fields for keeping a written record of phone calls, confirmations, changes, and the like. Read the Note Fields Guide to learn more.
Run NSure Queries for Patient Demographics and Insurance
If your company has an NSure account and has enabled AngelTrack's NSure integration, then you can easily run an NSure query to fill in any missing demographic information.
From the Dispatch Create page, and from the "Patient" tab of the Dispatch Edit page, find the popup patient editor's icon ![]() . When AngelTrack's NSure integration is active, the NSure icon
. When AngelTrack's NSure integration is active, the NSure icon ![]() appears next to it. If it is green, then clicking it will run an insurance eligibility check for the date of service of the associated dispatch; if it is greyed-out, then the patient's insurance is not yet on-file and so the eligibility checker cannot run yet.
appears next to it. If it is green, then clicking it will run an insurance eligibility check for the date of service of the associated dispatch; if it is greyed-out, then the patient's insurance is not yet on-file and so the eligibility checker cannot run yet.
To query NSure for demographics or insurance discovery, open the popup patient editor. On the "Demographics" tab, the NSure icon appears at the right, ready to run a query against the NSure Demographics Verifier product. On the "Insurance" tab, the icon appears again at the right, ready to run a query against the NSure Insurance Discovery product.
If you run those queries, and the patient's primary insurance policy is subsequently found and locked, then closing the popup patient editor will allow you to run the eligibility checker.
Retroactively Reassign a Dispatch to a Different Shift
You can retroactively change the assignment of a dispatch from one shift to another, or from a shift to an affiliate, or vice versa.
From the Dispatch Edit page, the current assignment is shown at the top as a link:
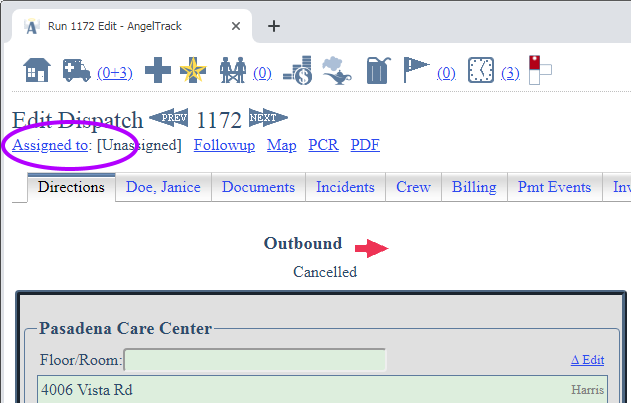
Click the link to change the assignment.
The Dispatch Assign page will open, and it will show the shifts and affiliates that were available at the time the dispatch activated.
Uncancel a Dispatch
If you wish to un-cancel a dispatch and instead mark it completed or delegated, do so by assigning it to the shift or affiliate that ran it.
To do this, first open the call's Dispatch Edit page. (In order to find the dispatch in the Closed Dispatches list, you must unhide cancelled calls.) With the run ticket open, click the "Assigned To" link, as shown in the screenshot above. The link will take you to the Dispatch Assign page, which will show you the lists of shifts and affiliates that were available at the time the dispatch activated.
Click the shift or affiliate who ran the call.
AngelTrack will change the dispatch to "Complete, as ordered" or "Delegated to affiliate" as appropriate. The dispatch will then appear in the assigned crew's list of incomplete reports.
Book a Dispatch Retroactively
If your company experiences a disaster event, and is forced to run on paper for a day or two, you may need to transfer the paper call records to AngelTrack.
This is not difficult; there is a link on the Dispatch Home page named "Book a Backdated Dispatch" that provides the necessary UI, but you must have Administrator rights to use it. To learn more, read the Retroactive Booking Guide.
Use Heatmaps to Choose Posting Sites
 The Call Volume Heatmap report, available from Dispatch Home, visually shows where your hotspots are. You can look for pickup hotspots or dropoff hotspots, for certain times of the day or all day, for any service levels you choose.
Using the filter controls on the heatmap, you can use it to choose posting locations for different times of day. You will probably see a pattern of hotspots in the morning, and a different pattern of hotspots in the evening.
Once you've got some posting locations in mind, you can define them as stations in AngelTrack. Once that's done, you can (when creating a new shift) assign a shift to post at one of those stations when not running a call. (Remember, each shift has a "based at" station and a separate "post at" location.) The crews' mobile devices will then direct them to return to that posting station after they finish their call.
Set Defaults for All New Trips
To reduce the amount of data required when booking a new trip, you can specify the default values for several important fields on the Dispatch Create page:
- Service level
- Priority
- Complaint
- Origin City
These defaults are configured on the Preferences page, under Settings.
You can also specify default tags, which will automatically be applied to every new trip, including those booked electronically via AngelTrack's various APIs. To learn more, please visit the Tags Guide.